

It’s the 21st century isn’t it and yet your classic scooter still can’t power a sat-nav or phone charger? Maybe you want to run LED bulbs but the lights flicker and they aren’t as bright as they should be?
There is a cheap and simple solution to this in the form of a ‘full DC’ or ‘full wave rectifier’ conversion. This allows your traditional 6-pole ignition to output (relatively) clean 12-volt DC, like you would get from a battery, while the engine is running.
This simple conversion for traditional 6-pole ignitions (Vespa PX, PK, Lambretta AF Ducati, Indian, BGM etc etc) offers many of the advantages of DC adapters, like the Mod Charger and Intelli-converter but for a fraction of the price.
Explain AC and DC in simple terms
AC stands for Alternating Current. In simple terms the electricity on an AC circuit is alternately passing in one direction and then back the other way. This is the sort of output that is naturally generated by your stator as the flywheel spins.
In traditional generator ignitions used as standard on many Vespa and Lambrettas this AC output is fine because old-style incandescent bulbs are dirty slags. They don’t care which end they get their electrical current from. As such, all that is required on non-battery scooters is to fit an AC regulator. This limits the maximum voltage output to 12Volts so that at high revs (when the stator can be making over 30Volts) you don’t blow any bulbs. Any excess power is dumped as heat; which is why the regulator has cooling fins on the outside.
DC stands for Direct Current. In simple terms, it means that electricity on a DC circuit flows only in one direction. This is the sort of output you get from a battery.
Complex electrical items like sat-navs and phones are a bit fussy and will only operate off a clean DC supply. LED bulbs also prefer DC; if you try to run them from an AC source then they will usually work but at reduced brightness.

Whassssup Wassel?
The easy solution to this is to convert your stator to run with a full-DC regulator-rectifier, know variously as a ‘Wassell’ conversion (after the old UK supplier of these components for Brit bikes). Such parts are widely available on eBay at very low prices using search terms ‘4-wire’ ‘single phase’ or ’full-wave’ regulator rectifier.
Such rectifiers are now available for less than £5 delivered because they are used on lots of Chinese scooters. The problem with auction site shopping is that while many different types look externally identical, internally they may have different circuitry and power handling characteristics. Many of the cheaper types are prone to voltage spikes and do not have any filtering circuits to produce a clean output.
In their intended use these regulator rectifiers are used to feed a 12Volt battery, and the battery has the capacity to absorb any voltage ripple or spikes, offering a clean 12Volt output.
For our use, on a scooter without a battery, then it is better to have a regulator-rectifier with the added filtering circuitry; particularly if you intend to use this system to charge expensive accessories such as mobile phones. Scootronics already produce such a regulator-rectifier – handily available here in the SLUK shop – and Readspeed are also in the process of producing their own version.
How it is wired
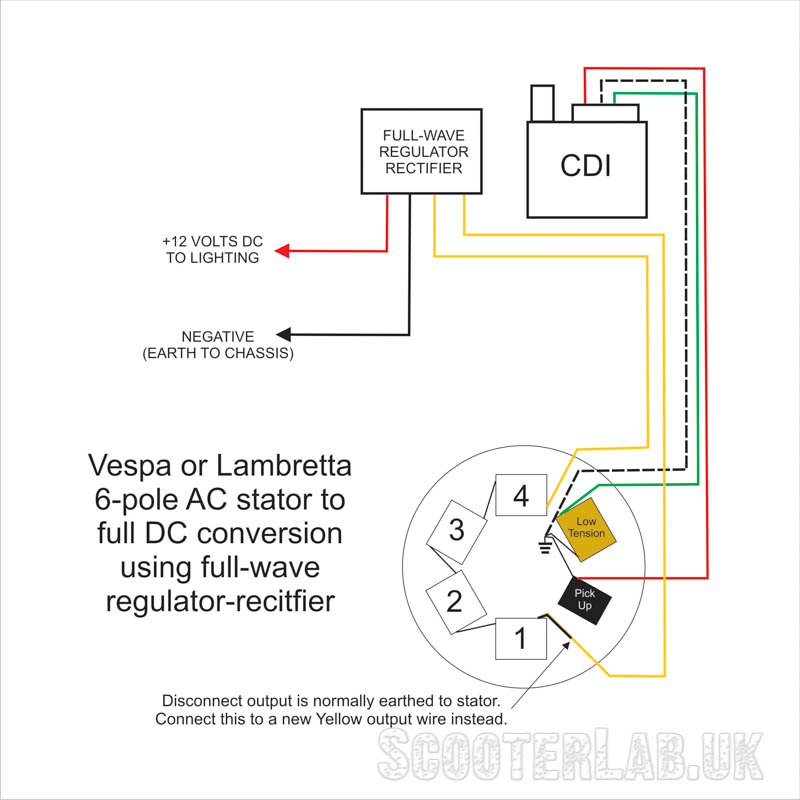
Traditionally, the correct regulators will have four wires: two yellow input wires for AC (on cheap Chinese clones one of these input wires is often pink) and two output wires (red = positive 12V, black = negative).

How to convert your stator
Before we start, first make sure you have the right type of stator.
This conversion works only for 12V AC stators where there are four lighting coils all in series (one connected to the other). At one end of this row of coils is a lighting output wire (usually yellow). At the other end of the series of coils the last copper winding has a trailing wire that is soldered directly to an earth tag on the stator.
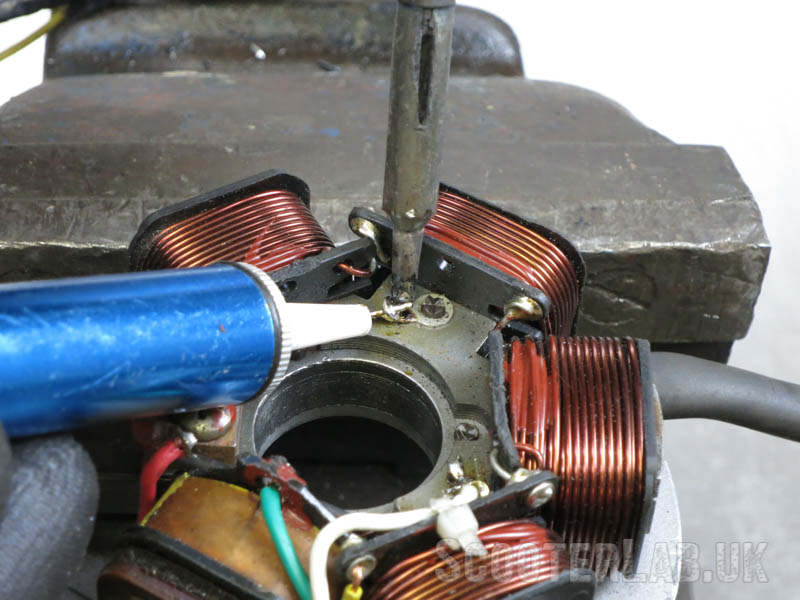

All you do is disconnect the wire from the earth tag by heating the joint with a soldering iron and pulling the wire free with thin-nosed pliers.


Afterwards solder another length of yellow wire to the end of this wire and insulate the joint with some heat-shrink sleeving.
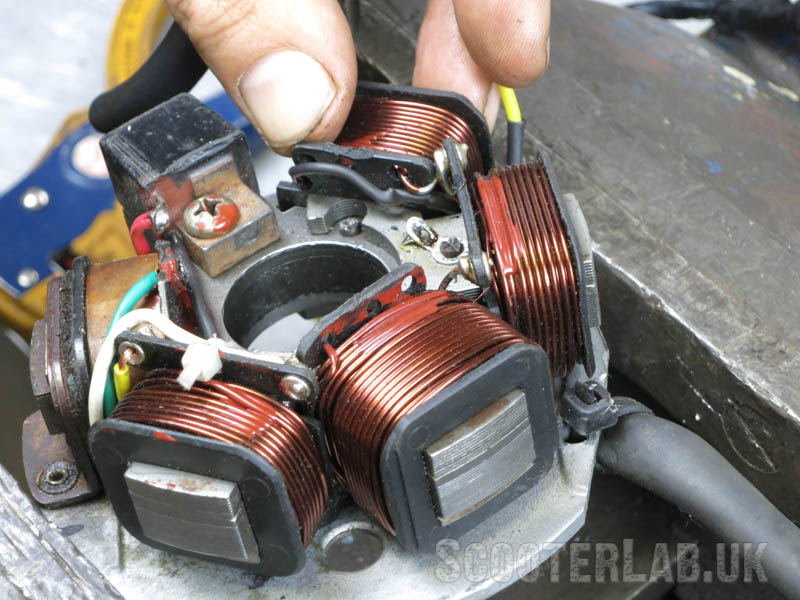

This new yellow wire should be pulled through the same sleeving as the other stator wires. I found the easiest way to do this was to first feed a steel gear cable inner through the sleeving from the outer end, solder the end of the cable to the yellow wire and use the cable to pull the yellow wire into place.
You now have a stator with two yellow AC output wires and a regulator/rectifier with two yellow input wires. Have a guess what you do with them?
What’s the point?
The reason we carried out this conversion on Sam’s SuperLui project was simple. We wanted to run a GPS speedometer as well as LED lights front and rear. For that we needed DC. This conversion was simply the cheapest and easiest solution to obtaining DC supply since it didn’t require a battery or any additional regulators.
It is possible to connect a 12V lighter socket, preferably via a fuse, to such a circuit. This will allow you to power low-current accessory items such as sat-navs or phone chargers while the engine is running.
Did it work?
We carried out the conversion and it worked perfectly, apart from one aspect; the horn. Horns tend to come in either AC or DC flavours, so if you convert a full AC system to DC then the chances are that you will need to change your horn as well.
What problems might you encounter?
On older vehicles with very simple electrical systems, where the entire lighting system is already powered from one yellow wire on the stator plate (e.g. most early Lambretta 12V conversions) then apart from changing the horn to DC you aren’t likely to encounter any great problems.
For vehicles with much more complicated electrical systems – for example AC versions of the Vespa PX with indicators – then it will be much more difficult due to the oddball way that both the horn and indicator relay operate. If you want a DC supply for some low-power accessories on an AC Vespa PX then the best bet is a Scootronics Intelli-converter (Sadly not available from the SLUK Shop because Mr Tambs can\’t currently build enough).

What a full DC conversion can’t do
This conversion can’t perform miracles, so at tick-over when your ignition system is producing less than 12Volts then you will still get flicker on LED lights and it may take some revs before other accessories power on. In our experience with the SuperLui, the GPS speedo was reliably powered from a normal Vespa PK stator, even at tick-over.
If you need solid 12 Volts even at low revs then you may be better off with an Intelli-Converter, as this features a voltage multiplication circuit so it can output 12Volts even when the stator is only feeding it 6Volts.
Verdict
This is a simple way to power DC accessories off an AC scooter as long as you can wield a flywheel extractor and a soldering iron.
Text and images: Sticky
Thanks to Readspeed and Anthony Tambs from Scootronics for help with this article.
For more on the Superlui Project, you should start reading here.
Pros
- Really easy to do if you can solder
- The simplest way to convert your current scooter wiring to DC
- Run DC accessories with no need for a converter or battery
Cons
- Regulator bigger than most others
- Might need a DC horn
- Might stop a SIP speedo’s rev counter from working unless more complex wiring is fitted.
- Without a battery it will only power devices or charge phones with the engine running.
We supply some Readspeed and Scootronics products in our SLUK Shop
It’s the 21st century isn’t it and yet your classic scooter still can’t power a sat-nav or phone charger? Maybe you want to run LED bulbs but the lights flicker and they aren’t as bright as they should be?
There is a cheap and simple solution to this in the form of a ‘full DC’ or ‘full wave rectifier’ conversion. This allows your traditional 6-pole ignition to output (relatively) clean 12-volt DC, like you would get from a battery, while the engine is running.
This simple conversion for traditional 6-pole ignitions (Vespa PX, PK, Lambretta AF Ducati, Indian, BGM etc etc) offers many of the advantages of DC adapters, like the Mod Charger and Intelli-converter but for a fraction of the price.
Explain AC and DC in simple terms
AC stands for Alternating Current. In simple terms the electricity on an AC circuit is alternately passing in one direction and then back the other way. This is the sort of output that is naturally generated by your stator as the flywheel spins.
In traditional generator ignitions used as standard on many Vespa and Lambrettas this AC output is fine because old-style incandescent bulbs are dirty slags. They don’t care which end they get their electrical current from. As such, all that is required on non-battery scooters is to fit an AC regulator. This limits the maximum voltage output to 12Volts so that at high revs (when the stator can be making over 30Volts) you don’t blow any bulbs. Any excess power is dumped as heat; which is why the regulator has cooling fins on the outside.
DC stands for Direct Current. In simple terms, it means that electricity on a DC circuit flows only in one direction. This is the sort of output you get from a battery.
Complex electrical items like sat-navs and phones are a bit fussy and will only operate off a clean DC supply. LED bulbs also prefer DC; if you try to run them from an AC source then they will usually work but at reduced brightness.
You’ll need soldering tools, wire and some heat-shrink sleeving for this job
Whassssup Wassel?
The easy solution to this is to convert your stator to run with a full-DC regulator-rectifier, know variously as a ‘Wassell’ conversion (after the old UK supplier of these components for Brit bikes). Such parts are widely available on eBay at very low prices using search terms ‘4-wire’ ‘single phase’ or ’full-wave’ regulator rectifier.
Such rectifiers are now available for less than £5 delivered because they are used on lots of Chinese scooters. The problem with auction site shopping is that while many different types look externally identical, internally they may have different circuitry and power handling characteristics. Many of the cheaper types are prone to voltage spikes and do not have any filtering circuits to produce a clean output.
In their intended use these regulator rectifiers are used to feed a 12Volt battery, and the battery has the capacity to absorb any voltage ripple or spikes, offering a clean 12Volt output.
For our use, on a scooter without a battery, then it is better to have a regulator-rectifier with the added filtering circuitry; particularly if you intend to use this system to charge expensive accessories such as mobile phones. Scootronics already produce such a regulator-rectifier – handily available here in the SLUK shop – and Readspeed are also in the process of producing their own version.
How it is wired
Traditionally, the correct regulators will have four wires: two yellow input wires for AC (on cheap Chinese clones one of these input wires is often pink) and two output wires (red = positive 12V, black = negative).
The last wire in this series of coils is connected to an earth tag on the stator. This is the bit we need to modify.
How to convert your stator
Before we start, first make sure you have the right type of stator.
This conversion works only for 12V AC stators where there are four lighting coils all in series (one connected to the other). At one end of this row of coils is a lighting output wire (usually yellow). At the other end of the series of coils the last copper winding has a trailing wire that is soldered directly to an earth tag on the stator.
If you have a solder-sucker you can de-solder the earth tag.
Alternatively simply heat the joint and pull the wire from the tag with pliers.
All you do is disconnect the wire from the earth tag by heating the joint with a soldering iron and pulling the wire free with thin-nosed pliers.
Strip the end of your new Yellow AC wire.
Solder the coil output to the new Yellow wire.
Slide on a length of heat-shrink sleeving and warm with a lighter or heat gun.
Afterwards solder another length of yellow wire to the end of this wire and insulate the joint with some heat-shrink sleeving.
Feed the new yellow wire through to meet with the others exiting the stator plate
Feed an inner cable through the sleeving and use it to pull the new wire into position.
This new yellow wire should be pulled through the same sleeving as the other stator wires. I found the easiest way to do this was to first feed a steel gear cable inner through the sleeving from the outer end, solder the end of the cable to the yellow wire and use the cable to pull the yellow wire into place.
You now have a stator with two yellow AC output wires and a regulator/rectifier with two yellow input wires. Have a guess what you do with them?
What’s the point?
The reason we carried out this conversion on Sam’s SuperLui project was simple. We wanted to run a GPS speedometer as well as LED lights front and rear. For that we needed DC. This conversion was simply the cheapest and easiest solution to obtaining DC supply since it didn’t require a battery or any additional regulators.
It is possible to connect a 12V lighter socket, preferably via a fuse, to such a circuit. This will allow you to power low-current accessory items such as sat-navs or phone chargers while the engine is running.
DC Conversion wiring diagram
Did it work?
We carried out the conversion and it worked perfectly, apart from one aspect; the horn. Horns tend to come in either AC or DC flavours, so if you convert a full AC system to DC then the chances are that you will need to change your horn as well.
What problems might you encounter?
On older vehicles with very simple electrical systems, where the entire lighting system is already powered from one yellow wire on the stator plate (e.g. most early Lambretta 12V conversions) then apart from changing the horn to DC you aren’t likely to encounter any great problems.
For vehicles with much more complicated electrical systems – for example AC versions of the Vespa PX with indicators – then it will be much more difficult due to the oddball way that both the horn and indicator relay operate. If you want a DC supply for some low-power accessories on an AC Vespa PX then the best bet is a Scootronics Intelli-converter (Sadly not available from the SLUK Shop because Mr Tambs can’t currently build enough).
The Scootronics version of the regulator-rectifier we ended up using has a higher voltage output producing brighter lights. It also comes with pre-fitted connectors on the Red and Black (sleeved) wires.
What a full DC conversion can’t do
This conversion can’t perform miracles, so at tick-over when your ignition system is producing less than 12Volts then you will still get flicker on LED lights and it may take some revs before other accessories power on. In our experience with the SuperLui, the GPS speedo was reliably powered from a normal Vespa PK stator, even at tick-over.
If you need solid 12 Volts even at low revs then you may be better off with an Intelli-Converter, as this features a voltage multiplication circuit so it can output 12Volts even when the stator is only feeding it 6Volts.
Verdict
This is a simple way to power DC accessories off an AC scooter as long as you can wield a flywheel extractor and a soldering iron.
Text and images: Sticky
Thanks to Readspeed and Anthony Tambs from Scootronics for help with this article.
For more on the Superlui Project, you should start reading here.
Pros
- Really easy to do if you can solder
- The simplest way to convert your current scooter wiring to DC
- Run DC accessories with no need for a converter or battery
Cons
- Regulator bigger than most others
- Might need a DC horn
- Might stop a SIP speedo’s rev counter from working unless more complex wiring is fitted.
- Without a battery it will only power devices or charge phones with the engine running.
We supply some Readspeed and Scootronics products in our SLUK Shop
-

Scootronics 120 watt Wassel type DC voltage regulator – Vespa/Lambretta
£23.00 -
Readspeed Red Devil five plate clutch – Lambretta
£274.99 -
Readspeed Red Devil six plate clutch – Lambretta
£299.99 -
ScooterNova – Issue 15 | MAGAZINE
£5.00 -
ScooterNova – Issue 14 | MAGAZINE (Copy)
£5.00 -

SLUK Support SIP | VESPA GTS GTV
£37.00







Would it be possible to run a battery with this setup ie connect the positive battery terminal to the red output? Useful for the sip speedo when the scooter is not running and to power lights properly at low tick over…?
Yes, this will run/charge a battery which is fine if you already have a battery wiring system on the scooter. The most important thing is to make sure you have a battery ignition switch and wiring so that the battery is isolated when the ignition is switched off so it can’t drain while the engine isn’t running.
You mention the problem with vespa indicators. LED relay and bobs would cure that quickly enough, wouldn’t it? Similarly (from memory, I’d need to do a switch to check) a DC model horn switch, with wiring that runs to earth after the horn, would be a possible solution there. Can’t see any reason why not, but it would need testing.
You mention the problem with vespa indicators. LED relay and bulbs would cure that quickly enough, wouldn’t it? Similarly (from memory, I’d need to do a switch to check) a DC model horn switch, with wiring that runs to earth after the horn, would be a possible solution there. Can’t see any reason why not, but it would need testing.
Not sure an AC Vespa indicator relay will work on DC, LED bulbs and resistors to stop them flashing at the wrong speed is a.different issue.
has anyone tried that yet
Whats to be expected if this conversion fails? No lights and then a need to replace a lighting coil? Or will it transfer to the ignition side as well?
It is a totally separate circuit to the ignition (still) so the engine wouldn’t necessarily stop running if the lighting circuit suffered a problem.
I did something similar to my lambretta but kept loosing enough power at tick over to power sat nav which is when you normally need it most at junctions and roundabouts,I found this very frustrating.Went for the battery option in the end,trickle charged from the engine,much better for sat nav use with no loss of power.
MaPalDr.RobertDidThisConversionOanMaLammieOoooooooooooodlesO`LeccieJuiceTheNoooo;0)
Replicated the above, but why does the headlight glow fractionally brighter as i rev? voltage at and above 2k rpm is 14- 14.5 v max at the battery. voltage at the headlight socket reaches 14 on revving.
I have a stator with four poles, two 30W with one yellow and one green=earth.
Ignition coil which is grey goes to CDI
The last one is grey and not in use at the moment.
I understand that I can’t use three but could I float the two 30W coils? I plan on using a reg/rec with a battery.
Has anyone actually converted a PX with both AC and DC to fully DC ?
If you have, how did you do it ?
Would it be possible to simply change to a DC stator and DC CDI
Nice job !! But what to do with the white wire ? In total (after transformation) there are 5 wires : 2 yellow, 1 red, 1 green and 1 white.
I did this a few years ago on my px and added a battery, had problems with the clocks but sorted it with a fix used on old Morris minors. Little cheap electrical rectifier, easily fits in the headlight. Works for me !